Getting Started With Google Tag Manager
Getting Started with Google Tag Manager – Publishing Google Analytics
Publishing Google Analytics to your site is relatively straightforward via Google Tag Manager. Once set up you’ll be able to add event tracking and a range of other tags to your site without having to roll out additional tracking code on your site.
Google Tag Manager can also significantly cut down on the development time needed to track a range of visitor interactions from file downloads through to video plays and e-commerce transactions.
Note that if you already have Google Analytics on your site you’ll need to think about migrating any additional tracking you have on the site over to tags in Google Tag Manager in advance.
Creating a Tag Manager Account
To begin you’ll first need a Google account – log in and then go to tagmanager.google.com to set up a tag manager account. You can set up multiple sites within a tag manager account but if you manage sites for multiple organisations it’s best to stick to a single account per organisation.
To add a new account, enter an account name from the Admin screen.

Click continue and you’ll then be asked to set up a container. Typically you’ll have one container per web property (or App) although complex sites may handle this differently.

Typically for a website you’ll enter the name of the website (or its domain name).
Under Where to Use Container select the type of site you want to manage. Select Web for a normal website or (iOS or Android for an App). Click create to complete this step.
Installing the Tag Manager Code on Your Site
To add Google Tag Manager to your website you’ll need to copy some code and paste it into your website template so that it appears on all pages throughout your site.
It’s important that you add the code in the right place – it must appear just after the opening “” tag in your HTML code.

To access the code click Admin at the top of the screen, and select Install Google Tag Manager underneath the Container. Copy and paste the code from the next screen.
Add a Google Analytics Tag to Google Tag Manager
The container you created above is essentially a holding store for all of the tags you’ll deploy to your website. Google Analytics is published via one of these tags.
As each tag that reports data to Google Analytics needs to refer to your Google Analytics Property account (the code that appears in the UA-XXXXXX-X format) it can save time to store the account number as a “constant” and then simply refer to it in each of your tags.
To create a new Variable and Universal Analytics Tag first click onto Variables and then click new.

Give the variable a name e.g. “UA Number” as shown below and select the “Constant” option.
Then Under Configure Variable enter your UA tracking id – found in the Property Settings for your account in Google Analytics. Click Create Variable
The final step is to create a tag that publishes Google Analytics to your site.

Back in the Container screen, select Tags from the left-hand side menu and click New Tag

Click on ‘Untitled Tag’ at the top to rename your new tag – something like “Google Analytics”
Select Google Analytics as the product
Select Universal Analytics as the tag type – this is the latest version of Google Analytics (although there’s also the option to use the older version).
You next need to select the account to send data to
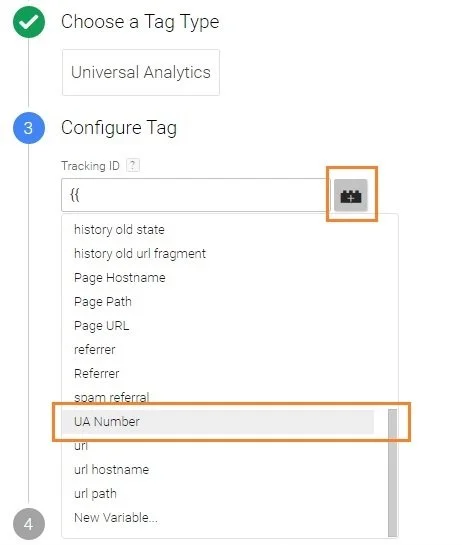
Under Configure Tag click the add button next to the Tracking ID field
Select your newly created user defined variable constant ‘UA number’
Using your new constant has the advantage that, particularly as your tracking requirements become more complex, you can simply enter the variable rather than having to remember your UA number each time you create a new tag. Remember, altering the constant will also affect all associated Tags.
Select Pageview underneath track type
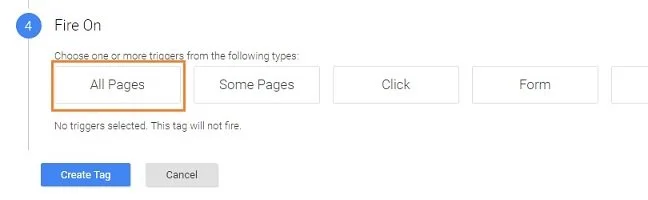
Under Fire On select All Pages (assuming you want to track your full site)
Click Create Tag
Almost there – you now just need to Publish the tag and test that things are working. Click “Publish” at the top right hand side of the screen to do so. It’s worth logging into Analytics after you do so to check out the real time reports that show you who is on the site right now – go to your website and check that you can see hits coming through.
(Note that sometimes real time reports can be suspended if you haven’t checked into that view for a while – once you check back in they will be reactivated but this can lead to a delay in data appearing).
