The latest news and our thoughts on the world of analytics and digital strategy.
Where has the GA4 Configuration tag gone?
Google have recently replaced the old GA4 Configuration tag in Google Tag Manager with a new Google Tag.
Google have recently retired the old GA4 Configuration tag in Google Tag Manager. This has been replaced by a new Google tag designed to integrate with a range of other Google tools. Configuration settings variables allow you to set parameters for all events that use the Google Tag - for example to track a section of the site or the language selected.
If you previously set up a configuration tag no further action should be necessary - existing configuration tags should automatically be converted.
Moving forwards, if you need to set up a GA4 configuration tag, the process is now as follows.
Sign into your Google Tag Manager Account and open your chosen workspace.
Go to Tags and click ‘New’ in the top right corner.
Enter your tag’s name in the top left and click Tag Configuration.
From this menu, you can either select Google Tag or Google Analytics.

If you select Google Analytics, you will be given another menu and will need to select Google Tag. If you choose Google Tag, you will be taken to the Tag Configuration menu.

You will then need to provide your Tag ID, for GA4 this is your Measurement ID.
You can find your Measurement ID in your GA4 account under Admin -> Data Streams -> Your website data stream.
You can then copy your Measurement ID and paste it into the Tag ID field in Tag Manager. You may want to save this as a constant variable so can easily access this for other event tags you configure.
Underneath this, you can then select Triggering and from the menu select Initialization All Pages and save your new tag.

Congratulations, now your new Google tag is set up.
Looking for a Google Analytics agency to help with a project or want to take your own tracking to the next level? Why not contact us at info@andersanalytics.com.
Custom Templates for Google Tag Manager
Custom templates, a new feature recently built into Tag Manager, are potentially great for getting things done in Google's ever useful management tool.
Custom templates, a new feature recently built into Tag Manager, are potentially great for getting things done in Google's ever useful management tool.
Custom templates allow you to write and use your own definitions for custom tracking solutions not already built into GTM's already fairly comprehensive list of built-in templates you see whenever you set up a new tag or variable. This allows advanced users to write and manage new templates and give permission to less technical users so they can use them as they would built-in tags, without getting their hands dirty with code.

The power in them lies in the use of permissions to strictly control the behaviour of the sandbox API they must use. This means declaring exactly what your custom tags or variables are permitted to do so other users can see.
This is great for larger organisations that want to deploy bespoke tagging functionality without adding loads of extra code to a site - developers can write the new templates and marketers can see exactly what they do and use them when needed.
New Tag Templates for Google Tag Manager
New secure third-party tag templates have been added to Google Tag Manager!
Google has announced some recent additions and changes to Tag Manager that enable easier integration with popular vendor tools, tighter security, and ensuring broader compatibility.
New secure third-party tag templates have been added to Google Tag Manager!
Google has announced some recent additions and changes to Tag Manager that enable easier integration with popular vendor tools, tighter security, and ensuring broader compatibility.
Making It Easy For Marketers
Marketers now have access to an ever-growing list of tag templates that make it easier to add and maintain tags without needing to code them. This means less hassle, and fewer mistakes!
Some of the recently added tag templates that can be used include:
Hotjar
Leadlab
Optimise
Bing Ads
Shareaholic
Infinity
Bizrate Insights
...many more besides! (A full list of available tags can be found here)
All of the new Tag Manager snippets now use secure HTTPS by default regardless of the protocol used on the page (previously they defaulted to the protocol used on the page).
New Rules For Container Snippets
Another change made is to Google's recommended implementation of container snippets.
Previously the whole container was placed before the openingtag on a web page.
Now it is split into two parts:
the Javascript snippet should be placed as high as possible in thesection of the page;
and the iframe snippet should be placed just after the openingtag.
According to Google any existing implementation will continue to function, but it may be a good idea to begin updating to the new format as soon as yuo have time.
And of course don't forget to test any changes you make!
Tracking LinkedIn Conversions Using Google Tag Manager
Tracking conversions across websites using LinkedIn has just got easier.
Tracking conversions across websites using LinkedIn has just got easier.
With native conversion tracking you can monitor what sponsored content and text ads lead to conversions.
LinkedIn Insight Tags can now be placed across your whole web property. Placing and managing these is made easy by using Google Tag Manager - all you need is the Conversion Tracking Insight ID from the LinkedIn Campaign Manager.
How to use Tag Manager to publish a LinkedIn insight tag:
Log into Google Tag Manager
Navigate to Tags and click New. Select Tag Configuration to begin.

Choose LinkedIn Insight from the list of tag types
Copy your Insight ID to the Partner ID box
Next, select or configure your trigger based on your campaign goals, whether it's all pages or a subset of your site
Click save.
You can track seven new conversions using the LinkedIn Campaign Manager:
Total Conversions
Post-click conversions
View-through conversions
Conversion Rate
Cost per conversion
Conversion Value
Return on Ad Spend
Each LinkedIn ad account you requires their own unique Insight Tag to be placed on the website you'd like to track.
When you've added your code using Tag Manager, head back to LinkedIn's Campaign Manager and choose which types of conversion you'd like to track.
For full instructions head over to LinkedIn's help page on setting up conversion tracking.
Google Tag Manager Update - Introducing Workspaces
In addition to a range of improvements to the user interface Google has also recently launched "workspaces" in Google Tag Manager.
In addition to a range of improvements to the user interface Google has also recently launched "workspaces" in Google Tag Manager.
Previously updates to tracking were developed and tested within a single draft container before being saved and then published. Whilst this worked well for many organisations for larger companies with complex tracking requirements often with a range of people updating different tags this sometimes caused problems. For example publishing an urgent fix to a tag would also mean publishing all other changes in the container - some of which might not be ready.
With the launch of workspaces it's now possible for larger teams to work on a range of tags at the same time. When a tag is ready it can then be published without also taking everything else that's in development live. If tags worked on in one workspace are then changed in another Tag Manager will let you know if there are any conflicts when the next version is created.
Getting Started With Google Tag Manager
Getting Started with Google Tag Manager – Publishing Google Analytics
Getting Started with Google Tag Manager – Publishing Google Analytics
Publishing Google Analytics to your site is relatively straightforward via Google Tag Manager. Once set up you’ll be able to add event tracking and a range of other tags to your site without having to roll out additional tracking code on your site.
Google Tag Manager can also significantly cut down on the development time needed to track a range of visitor interactions from file downloads through to video plays and e-commerce transactions.
Note that if you already have Google Analytics on your site you’ll need to think about migrating any additional tracking you have on the site over to tags in Google Tag Manager in advance.
Creating a Tag Manager Account
To begin you’ll first need a Google account – log in and then go to tagmanager.google.com to set up a tag manager account. You can set up multiple sites within a tag manager account but if you manage sites for multiple organisations it’s best to stick to a single account per organisation.
To add a new account, enter an account name from the Admin screen.

Click continue and you’ll then be asked to set up a container. Typically you’ll have one container per web property (or App) although complex sites may handle this differently.

Typically for a website you’ll enter the name of the website (or its domain name).
Under Where to Use Container select the type of site you want to manage. Select Web for a normal website or (iOS or Android for an App). Click create to complete this step.
Installing the Tag Manager Code on Your Site
To add Google Tag Manager to your website you’ll need to copy some code and paste it into your website template so that it appears on all pages throughout your site.
It’s important that you add the code in the right place – it must appear just after the opening “” tag in your HTML code.

To access the code click Admin at the top of the screen, and select Install Google Tag Manager underneath the Container. Copy and paste the code from the next screen.
Add a Google Analytics Tag to Google Tag Manager
The container you created above is essentially a holding store for all of the tags you’ll deploy to your website. Google Analytics is published via one of these tags.
As each tag that reports data to Google Analytics needs to refer to your Google Analytics Property account (the code that appears in the UA-XXXXXX-X format) it can save time to store the account number as a “constant” and then simply refer to it in each of your tags.
To create a new Variable and Universal Analytics Tag first click onto Variables and then click new.

Give the variable a name e.g. “UA Number” as shown below and select the “Constant” option.
Then Under Configure Variable enter your UA tracking id – found in the Property Settings for your account in Google Analytics. Click Create Variable
The final step is to create a tag that publishes Google Analytics to your site.

Back in the Container screen, select Tags from the left-hand side menu and click New Tag

Click on ‘Untitled Tag’ at the top to rename your new tag – something like “Google Analytics”
Select Google Analytics as the product
Select Universal Analytics as the tag type – this is the latest version of Google Analytics (although there’s also the option to use the older version).
You next need to select the account to send data to
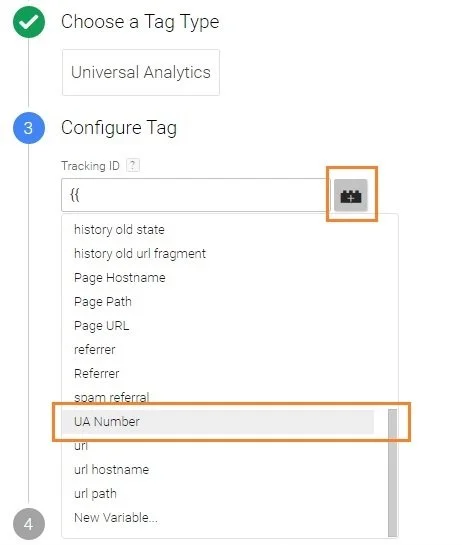
Under Configure Tag click the add button next to the Tracking ID field
Select your newly created user defined variable constant ‘UA number’
Using your new constant has the advantage that, particularly as your tracking requirements become more complex, you can simply enter the variable rather than having to remember your UA number each time you create a new tag. Remember, altering the constant will also affect all associated Tags.
Select Pageview underneath track type
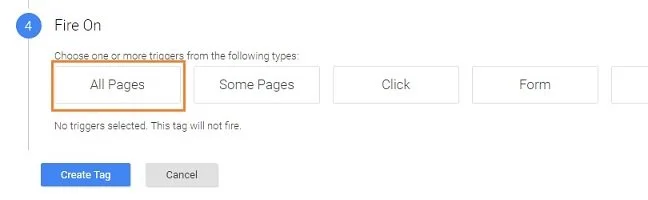
Under Fire On select All Pages (assuming you want to track your full site)
Click Create Tag
Almost there – you now just need to Publish the tag and test that things are working. Click “Publish” at the top right hand side of the screen to do so. It’s worth logging into Analytics after you do so to check out the real time reports that show you who is on the site right now – go to your website and check that you can see hits coming through.
(Note that sometimes real time reports can be suspended if you haven’t checked into that view for a while – once you check back in they will be reactivated but this can lead to a delay in data appearing).
Enhancements to Google Tag Manager
Google have recently rolled out a series of improvements to Google Tag Manager.
These include:
New APIs that tailor the power of Google Tag Manager to your unique needs
A new intuitive interface to help you launch and edit tags even faster
More 3rd-party templates to make tagging easier
For further information please visit the Google Analytics blog.
An Introduction to Google Tag Manager
Google Analytics is a fantastic tool for measuring interactions with your website. It enables you to assess your marketing channels, analyse visitor journeys and capture what really matters to your organisation via goals.
The setup of Google Analytics is also pretty easy – you simply add a snippet of code that you obtain from your Google Analytics count to your site – ensuring that it appears on all pages.
Out of the box Google Analytics however has some limitations in terms of what you can capture on your site by default. For example if you want to capture visitors downloading files, clicking onto email links or outbound links or watching a video you need to add some additional code to your site to capture these via event tracking or virtual page views. Historically this has been achieved using Javascript added to your site – for example to onClick events (to capture when people click on a link or other web page element) or JQuery code – a Javascript library.
Google Tag Manager is a free tool from Google that makes setting up event tracking and adding tags to your site a lot easier. Rather than rely on your web development team to make complex changes to your site you can now use Google Tag Manager to add the Google Analytics tracking snippet, set up events (for example to track downloads or form completions) and even add other non-Google related tags to your site (e.g. Floodlight).
Google Tag Manager has been designed to be relatively easy to use and with a little learning you are free to take full control over tracking on your site. You start by creating a Google Tag Manager account at – www.google.com/tagmanager and create a “container” for your site. It’s then a matter of adding your Analytics account, configuring any advanced options you want to use and adding event tracking and other tags as required. Once complete you copy the tag manager code to your site so that it appears just after the opening <body> tag.